Python 作为一种脚本代码,不需要配置复杂的编译环境,而 Vim 具有优秀的英文编辑能力,使用Vim编辑Python是非常不错的选择。科学计算使用 Anaconda 构建虚拟的 Python 环境,这和普通的 pyenv 有点不同,本文将介绍在服务器中使用 Vim 进行 Python 科学计算编程。
Anaconda && Miniconda 安装
Anaconda 提供了虚拟环境管理的命令 conda 。不同项目所需要的 python环境是不同的,不同包直接解决依赖问题十分复杂,使用conda可以轻松的管理。
国内用户可以使用(anaconda | 镜像站使用帮助 | 清华大学开源软件镜像站 | Tsinghua Open Source Mirror) 进行安装。并按照它的教程,更换conda的源。Miniconda是Anaconda的精简版,如果你像我一样,不喜欢Anaconda带的多余的包,可以使用Miniconda,其安装方式和Anaconda相似。
正确安装后,应该得到类似如下的结果:

可以看到conda被加入了环境变量,运行python时,也是使用的Anaconda虚拟环境中的Python。
Vim && NeoVim 配置
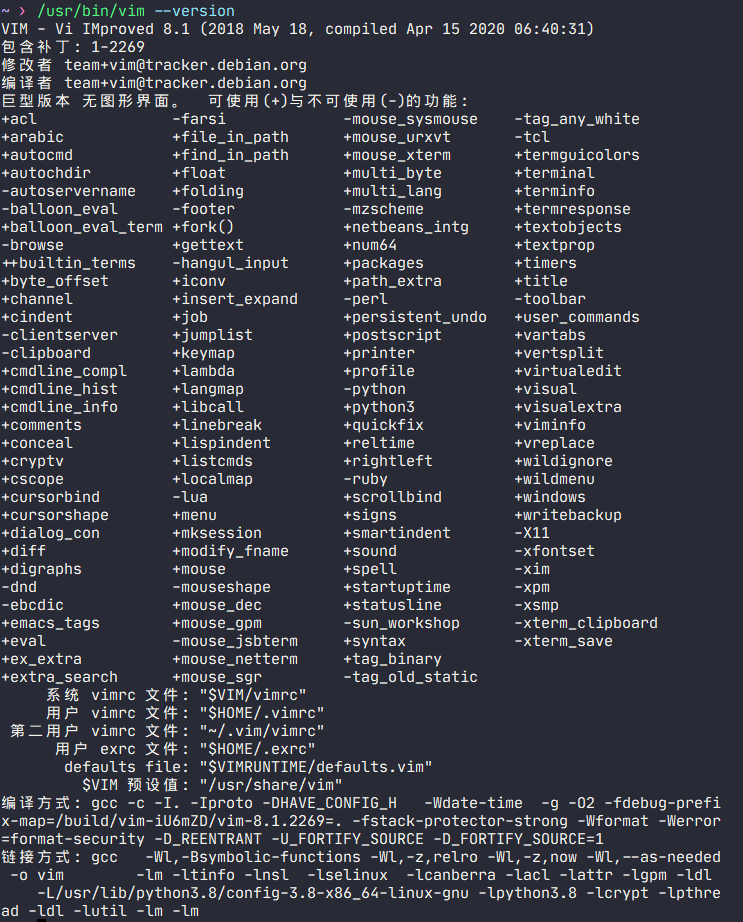
如果想要舒服的Vim体验,请先升级到Vim 8.0以上,并且支持clipboard和python3,可以使用vim –version查看。

如图,就是没有支持clipboard但支持了python3。当然还有另外一种选择,那就是NeoVim。NeoVim就没这么多限制了,装了就ok了。
插件安装
使用vim-plug进行插件管理,按照其Github上的ReadMe进行安装。
1
2
|
sh -c 'curl -fLo "${XDG_DATA_HOME:-$HOME/.local/share}"/nvim/site/autoload/plug.vim --create-dirs \
       https://raw.githubusercontent.com/junegunn/vim-plug/master/plug.vim'
|
然后在NeoVim的配置文件(~/.config/nvim/init.vim)中加入以下的代码:
 1
 2
 3
 4
 5
 6
 7
 8
 9
10
11
12
13
14
15
16
17
18
19
20
21
22
23
24
25
26
27
28
29
30
|
"""""""""""""""""""""""""""""""""""""""""""""""""""""""""""""""
"""""""""""""""Plug Install list"""""""""""""""""""""""""""""
set nocompatible              " required
filetype off                  " required

call plug#begin('~/.vim/plugged')

Plug 'neoclide/coc.nvim', {'branch': 'release'}
Plug 'Yggdroot/indentLine'
Plug 'mhinz/vim-signify'       "显示修改痕迹
Plug 'honza/vim-snippets'

Plug 'scrooloose/nerdcommenter'    "<Leader>c<space> 注释当前行或者反注释
Plug 'rhysd/clever-f.vim'
Plug 'kien/rainbow_parentheses.vim'
Plug 'Raimondi/delimitMate'        "shift-tab 跳出匹配的闭括号
Plug 'chiel92/vim-autoformat'
Plug 'mhinz/vim-startify'
if has('nvim')
    Plug 'Shougo/defx.nvim', { 'do': ':UpdateRemotePlugins' }
else
    Plug 'Shougo/defx.nvim'
    Plug 'roxma/nvim-yarp'
    Plug 'roxma/vim-hug-neovim-rpc'
endif
Plug 'skywind3000/asyncrun.vim'
Plug 'skywind3000/asynctasks.vim'
Plug 'wellle/tmux-complete.vim'
call plug#end()
|
然后打开 NeoVim,执行命令 :PlugInstall 。自动安装所需的插件。装完也许会提示你一些工具没有安装,比如 node、npm等,需要进行安装。
同时加入
1
|
let g:python3_host_prog = "/home/kissandrun/miniconda3/bin/python"
|
指定python host的位置,同时需要
这时,在NeoVim中执行 :checkhealth时,python3 显示满足依赖。其他 python2 啥的不用管。

自动补全
使用Coc作为自动补全的框架。在上面过程中,我们已经安装了Coc。安装coc-python、coc-snippets。
安装方法如下:
1
|
:CocInstall coc-python coc-snippets
|
进行Coc的配置,配置方法如下
他会自动打开配置文件,将下面内容复制进去。
1
2
3
4
5
6
7
8
9
|
{
  "python.linting.pylintEnabled": false,
  "python.linting.flake8Enabled": true,
  "python.linting.flake8Path": "/home/kissandrun/miniconda3/bin/flake8",
  "python.linting.flake8Args": ["--ignore=E126,E123,E24,E203,E501,W504,E402", "--verbose"],
  "python.jediEnabled": true,
  "python.jediPath": "/home/kissandrun/miniconda3/lib/python3.8/site-packages/",
  "python.linting.enabled": true
 }
|
Jedi安装
Coc的补全依赖于Jedi,安装方式如下:
然后修改上面的Coc配置文件,将我的Jedi目录换成你的,只要指定到site-packages即可。
效果展示

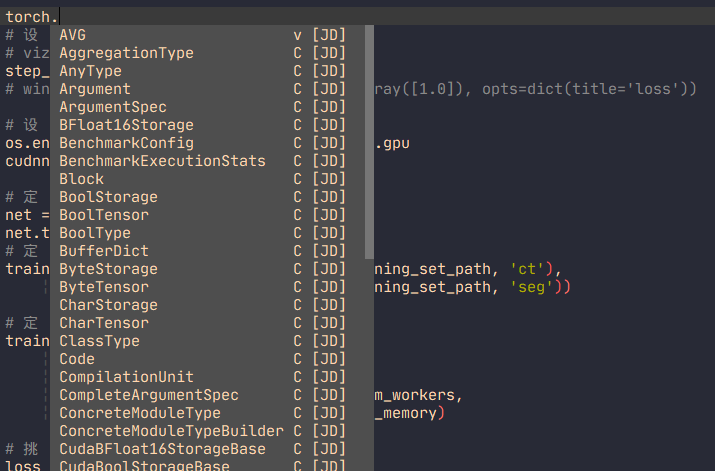
如图后面带 [JD] 的就是来自jedi的补全。
上面的配置还应该能够同时补全snippet和tmux中的内容。

Coc正确识别conda环境
使用conda时Coc好像不能正确识别python环境,需要在vim配置文件中加入如下:
1
2
3
4
5
6
|
if $CONDA_PREFIX == ""
    let s:current_python_path=$CONDA_PYTHON_EXE
else
    let s:current_python_path=$CONDA_PREFIX.'/bin/python'
endif
call coc#config('python', {'pythonPath': s:current_python_path})
|
代码检查
代码检查也依赖于Coc框架。我使用flake8进行代码检查。上面的Coc配置文件中已经写了。需要指定Flake8的安装路径,如果没有安装,可以使用如下代码安装:
效果如下图所示:

代码格式化
代码格式化使用 vim-autoformat 插件,在上面已经安装过了,该插件可以使用yapf,black等命令行工具对代码进行格式化,我的选择是black。
在vim配置文件中加入下面几行就可以完成设置:
1
2
|
noremap <leader>af :Autoformat<CR>
let g:formatters_python = ['black']
|
映射leader af 为格式化代码。
代码执行
深度学习的代码执行一般都是使用网络进行训练或者预测,所以建议新开一个tmux的窗口直接运行代码,而不在编辑器中运行。如果是小的python脚本,可以使用:
1
2
|
Plug 'skywind3000/asyncrun.vim'
Plug 'skywind3000/asynctasks.vim'
|
这两个插件实现。配置方法如下:
新建 .config/nvim/tasks.ini, 写入如下内容
 1
 2
 3
 4
 5
 6
 7
 8
 9
10
11
12
13
14
15
16
17
18
19
20
21
22
23
24
25
|
[file-run]
command="$(VIM_FILEPATH)"
command:c,cpp="$(VIM_PATHNOEXT)"
command:go="$(VIM_PATHNOEXT)"
command:python=ipython -i "$(VIM_FILENAME)"
command:make=make -f "$(VIM_FILENAME)" run
command:emake=emake -e "$(VIM_FILENAME)"
command:javascript=node "$(VIM_FILENAME)"
command:sh=sh "$(VIM_FILENAME)"
command:lua=lua "$(VIM_FILENAME)"
command:perl=perl "$(VIM_FILENAME)"
command:ruby=ruby "$(VIM_FILENAME)"
command:zsh=zsh "$(VIM_FILENAME)"
command:bash=bash "$(VIM_FILENAME)"
command:fish=fish "$(VIM_FILENAME)"
command:php=php "$(VIM_FILENAME)"
command:erlang=escript "$(VIM_FILENAME)"
command:ps1=powershell -file "$(VIM_FILENAME)"
command:scala=scala "$(VIM_FILENAME)"
command:haskell=ghci "$(VIM_FILENAME)"
command:applescript=osascript "$(VIM_FILENAME)"
command:vim=:source %
output=terminal
cwd=$(VIM_FILEDIR)
save=2
|
将python文件的执行命令设置为ipython,当然也可以设置为python,ipython方便查看变量,更适应科学计算需求。
然后在vim配置文件中加入如下配置
1
2
3
4
5
6
7
|
let g:asyncrun_rootmarks = ['.svn', '.git', '.root', '_darcs', 'build.xml']
" 自动打开 quickfix window ,高度为 6
let g:asyncrun_open = 6
" 任务结束时候响铃提醒
let g:asyncrun_bell = 1
let g:asynctasks_term_pos = 'bottom'
noremap <silent><f5> :AsyncTask file-run<cr>
|
这样设置之后,F5被设置为运行各种类型代码的快捷键。


